Generate Design Ideas
The second step in the design process is to generate a multitude of design ideas. After you have identified the need and as you continue to do your background research, this step allows exploration of existing and original possibilities before choosing an option to progress.
Some ways to generate design ideas are:
- Brainstorming: Come up with as many ideas as possible in a short amount of time without judgment or filtering.
- Brainwriting: As a group, write down ideas individually first. Then, share and develop each others' ideas.
- SCAMPER: Substitute, Combine, Adapt, Modify (Also Magnify and Minify), Put to another use, Eliminate, Rearrange
- TRIZ: Theory of Inventive Machines uses patterns of innovation from past inventions.
- Sketching Ideas: Make quick sketches of the ideas. 2D sketches of the ideas are a more straightforward and accurate recording and communication of the ideas.
- Low Fidelity Prototyping: Build simple prototypes using basic materials such as paper, cardboard, and clay. This is not a final prototype, but these early 3D prototypes help discover physical challenges and possibilities.
- And many other methods
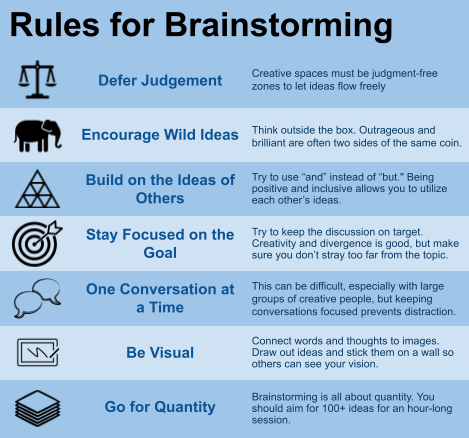
Content adapted from IDEO U — 7 Simple Rules of Brainstorming
A key rule of generating ideas
There should be no criticism or prejudgment of ideas. Create a free flow of ideas and record all suggestions!
Types of Mental Blocks
- Perceptual Block: Assuming a new solution should look like previous solutions
- Emotional or Environmental Block: Fear of unfamiliar ideas and criticism
- Intellectual Block: Lack of background knowledge, rigid thinking, or poor problem-solving strategies.
Four-Stages of Creative Thinking Process
The four stages of creative thinking process by Graham Wallas are...
1. Preparation: Examine and gather information about the different elements of the problem (ex. tradeoffs, boundaries)
2. Incubation: Take a break from thinking about the problem for the subconscious mind to work on it.
3. Inspiration: Let insights guide you to the path toward the solution.
4. Verification: Evaluate and test the solution. Then, modify repeatedly until there is no improvement to be made.
(Graham Wallas, The Art of Thought, 1926)
Morphological Chart
A morphological chart is a tool used to explore design options in an organized manner. It breaks down a product into its key functions and records multiple design options for each function. The chart is intended to show different combinations of possible features for creation of the best solution. Ideate within each function, then mix and match for new solutions.
For example, if you were designing a can opener, you could identify key functions such as:
- Material (steel, aluminum, plastic, wood)
- Handle Type (straight, curved, round, squishy/deformable)
- Cutting Mechanism (piercing blade, rotating blade, laser)
- Environment (recycle, biodegradable, compostable)
By creating different combinations of key functions, you can generate and evaluate multiple designs to come up with the most practical and feasible solution.
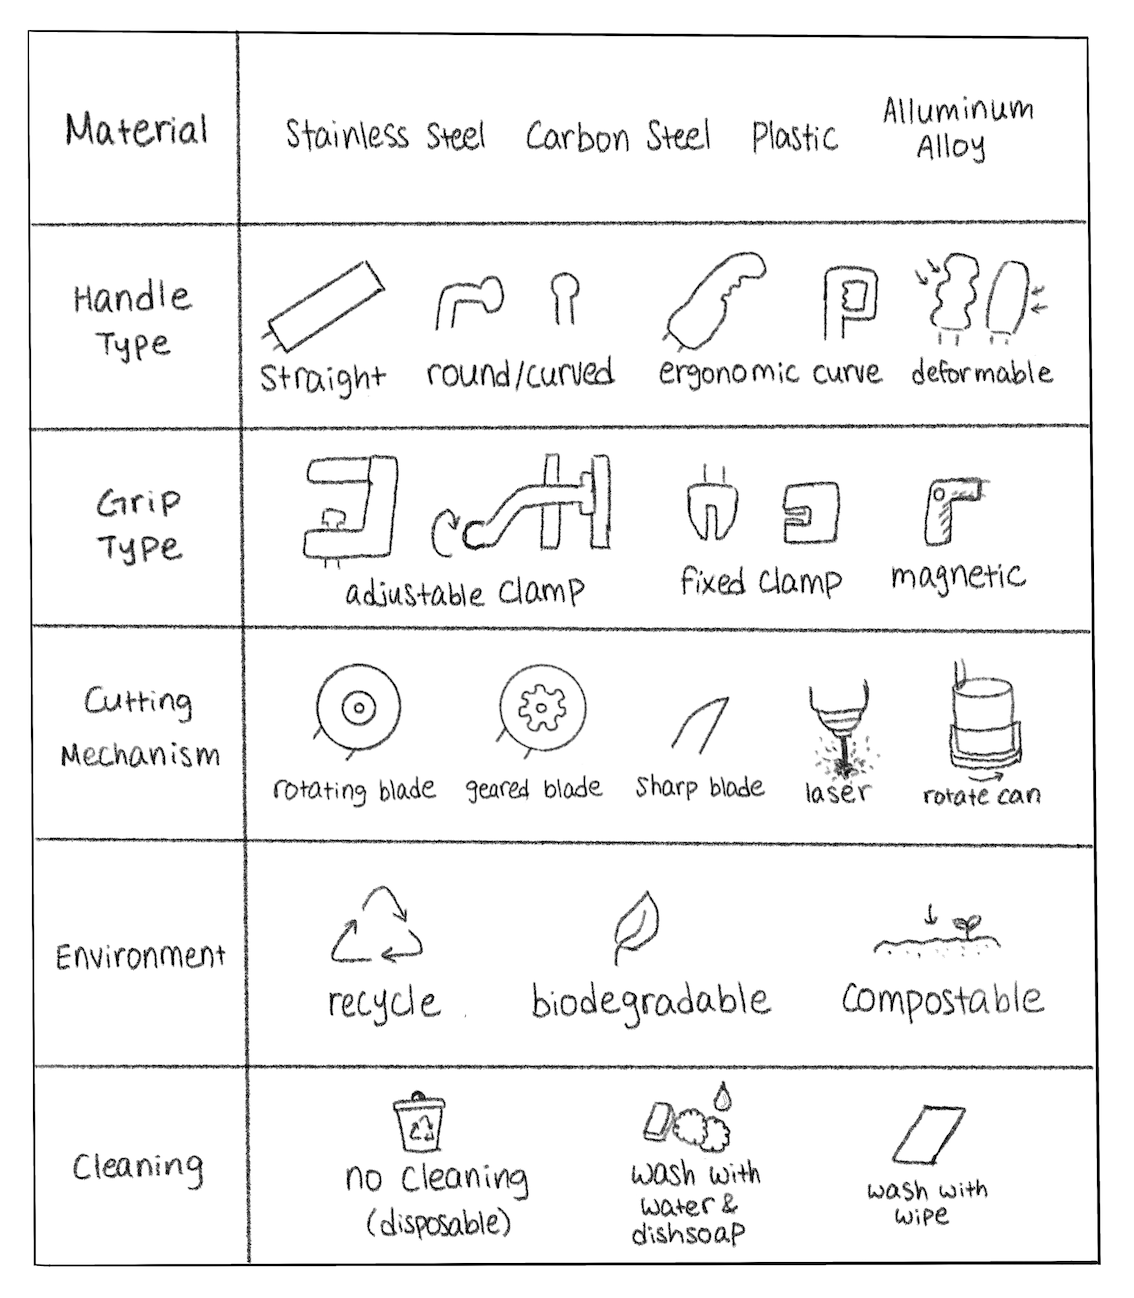
Example Morphological Chart
One of the numerous resulting combinations could be a carbon steel can opener with an ergonimic handle, magnetic clamp, and rotating blade that is compostable and disposable after use. This may not be the most optimal design. Explore and evaluate multiple combminations before selecting the best combinations.
Key Note
Keep in mind this is only a simplified example. When you create your own, try to make it more detailed and incorporate a wider range of ideas.